What is Zoraxy
Zoraxy is a new kid in reverse-proxy world written in Go, designed to simplify and streamline web routing and proxying. Zoraxy simplifies the process of setting up a reverse proxy, It serves as an intermediary between client requests and backend servers, effectively managing traffic flow. Whether you're running a small personal website or managing a complex web infrastructure, Zoraxy is designed to make these tasks accessible to all, regardless of your networking expertise.
Why Zoraxy
- Securing Your Website with HTTPS: Easily add TLS/SSL certificates to your website for enhanced security.
- Consolidating Multiple Web Servers: With just one public IP address, seamlessly route traffic to multiple web servers sharing the same outbound ports (e.g., 80/443).
- Streamlining Configuration Changes: Say goodbye to manual tweaks of Apache or Nginx configuration files every time you deploy new test web services.
- Implementing Access Control and Authentication: Whether it's blacklisting/whitelisting or basic authentication, gain control over who accesses your web server effortlessly.
These all comes with a Pretty UI ;)
 tobychui
Comparison with NPM
While Nginx Proxy Manager (NPM) is a popular choice for reverse proxying, Zoraxy offers several advantages. Zoraxy is designed to be lightweight and highly configurable, allowing for seamless integration with existing systems. Its intuitive interface and robust feature set make it an ideal solution for both beginners and experienced users alike. Additionally, Zoraxy provides comprehensive documentation and active community support, ensuring that users can quickly resolve any issues or questions that may arise.
In this guide I am trying to explain how to install Zoraxy in simple way and set-up your own reverse proxy.
Note: While Zoraxy offers powerful capabilities, it's important to note that as a relatively new product, it may contain bugs or limitations. Exercise caution, particularly when deploying it in production environments. Always conduct thorough testing and consider the potential risks before fully integrating Zoraxy into critical systems
Installation
Using Docker
Docker provides a convenient way to deploy Zoraxy Reverse Proxy within a containerized environment. To get started, simply run the following command:
docker run -d \
  --name=zoraxy \
  -p 80:80 \
  -p 443:443 \
  -p 8000:8000 \
  -v /path/to/zoraxy/config:/opt/zoraxy/data/  \
  zoraxydocker/zoraxy:latest
Replace /path/to/zoraxy/config with the path to your desired configuration directory
if you prefer the docker-compose method, here is the code
version: '3.3' #can be removed if you are using latest version of docker
services:
  zoraxy-docker:
    image: zoraxydocker/zoraxy:latest
    container_name: zoraxy
    ports:
      - 80:80
      - 443:443
      - 8000:8000/tcp
    volumes:
      - ./config:/opt/zoraxy/config/
    environment:
ARGS: '-noauth=false'| Operator | Need | Details |
|---|---|---|
-d | Yes | will run the container in the background. |
--name (container name) | No | Sets the name of the container to the following word. You can change this to whatever you want. |
-p (ports) | Yes | Depending on how your network is setup, you may need to portforward 80, 443, and the management port. |
-v (path to storage directory):/opt/zoraxy/config/ | Recommend | Sets the folder that holds your files. This should be the place you just chose. By default, it will create a Docker volume for the files for persistency but they will not be accessible. |
-e ARGS='(your arguments)' | No | Sets the arguments to run Zoraxy with. Enter them as you would normally. By default, it is ran with -noauth=false but you cannot change the management port. This is required for the healthcheck to work. |
zoraxydocker/zoraxy:latest | Yes | The repository on Docker hub. By default, it is the latest version that is published. |
Bring your container up
docker compose up -dNative Installation
For native installation, download the build file based on your OS and CPU architecture from Github Release Page
- Download the file
mkdir zoraxy
cd zoraxy
wget https://github.com/tobychui/zoraxy/releases/download/3.0.5/zoraxy_linux_amd64
mv zoraxy_linux_amd64 zoraxy
chmod +x zoraxy- Start the
zoraxyproxy
sudo ./zoraxy -port=:8000Setup system daemon for Zoraxy
Navigate to the zoraxy folder which you created earlier and create an shell file named start.sh
cd zoraxy
nano start.sh
paste the content to the file
#!/bin/bash
/home/geeks/zoraxy/zoraxy -port=:8000   //change the path to your executable
you have to adjust the /home/geeks/zoraxy based on your folder structure.
Make it executable with
chmod +x start.sh
Create systemd-service file with
sudo nano /etc/systemd/system/zoraxy.service
[Unit]
Description=Zoraxy Reverse Proxy Server
After=network-online.target
Wants=network-online.target

[Service]
Type=simple
User=root
Group=root
WorkingDirectory=/home/geeks/zoraxy
ExecStart=/home/geeks/zoraxy/start.sh
StandardOutput=syslog
StandardError=syslog
SyslogIdentifier=zoraxy

[Install]
WantedBy=multi-user.target
adjust the path /home/geeks/zoraxy
Reload systemd and Restart the Service:
sudo systemctl daemon-reload
sudo systemctl enable zoraxy
sudo systemctl start zoraxy
Check the Status
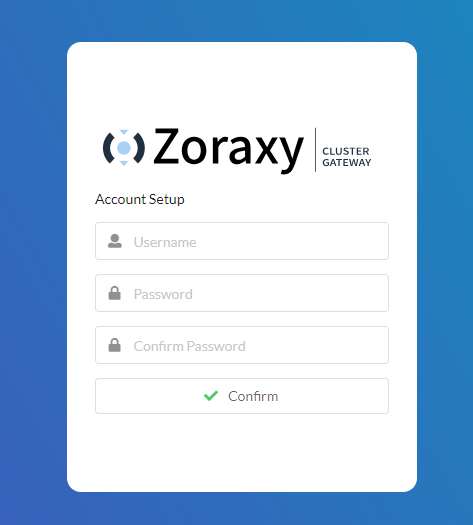
sudo systemctl status zoraxyLogin to the Admin Console
Navigate to http://<server ip>:8000 to access admin console
The Admin Console
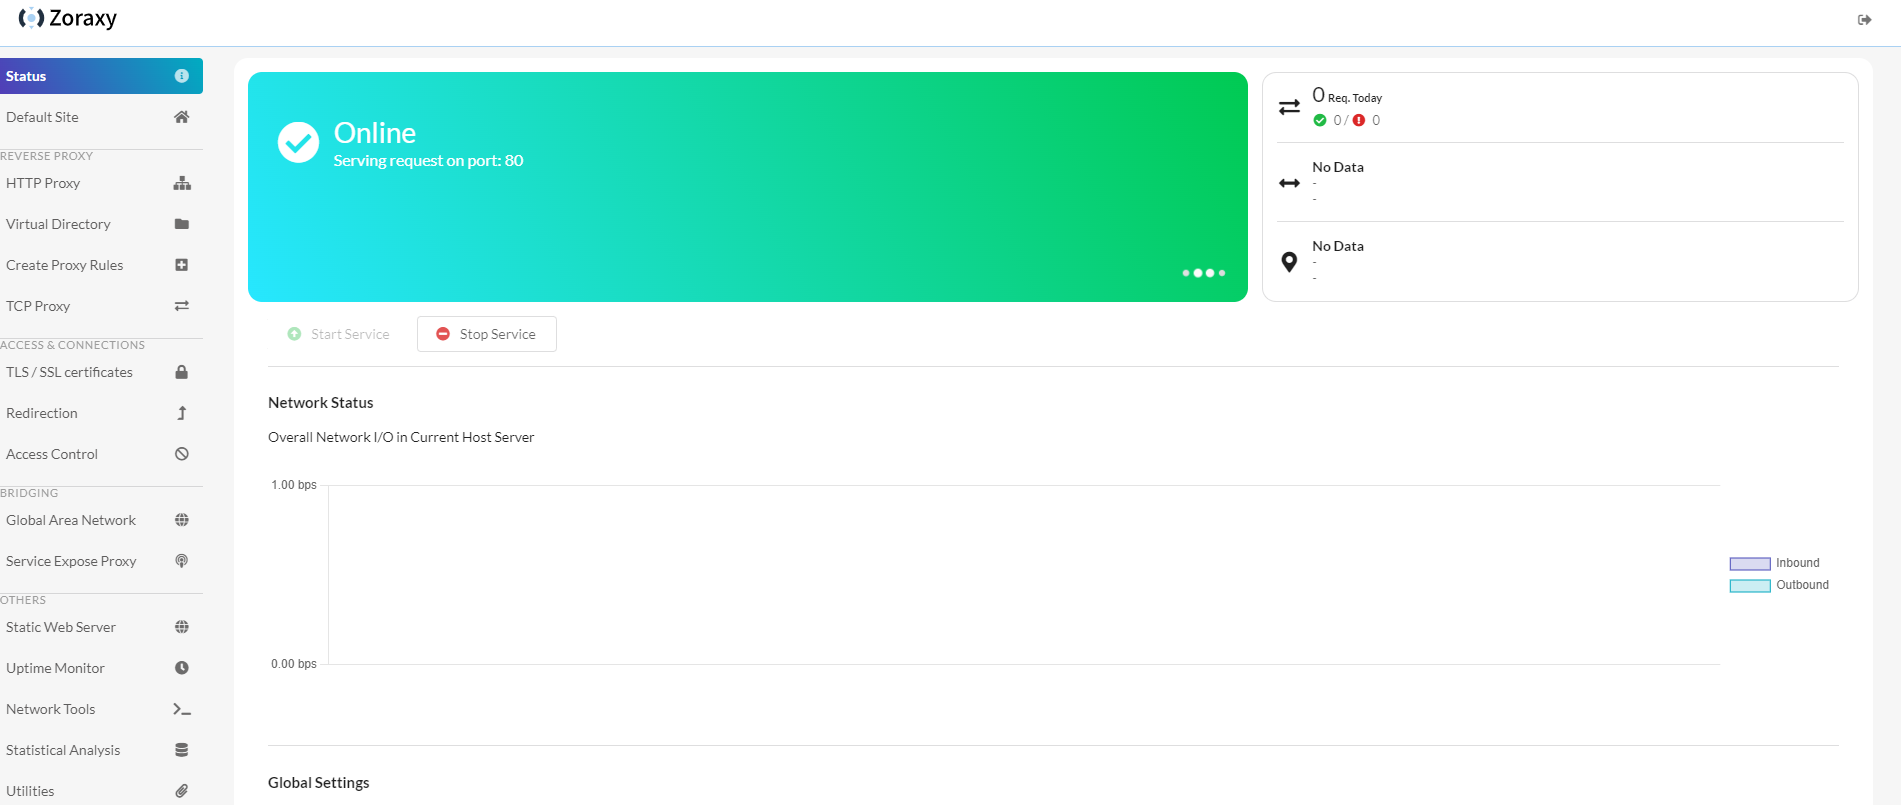
Enable TLS Setting
On the same landing page on bottom you will find the Global Settings enable the TLS as follows

Creating Proxy Host
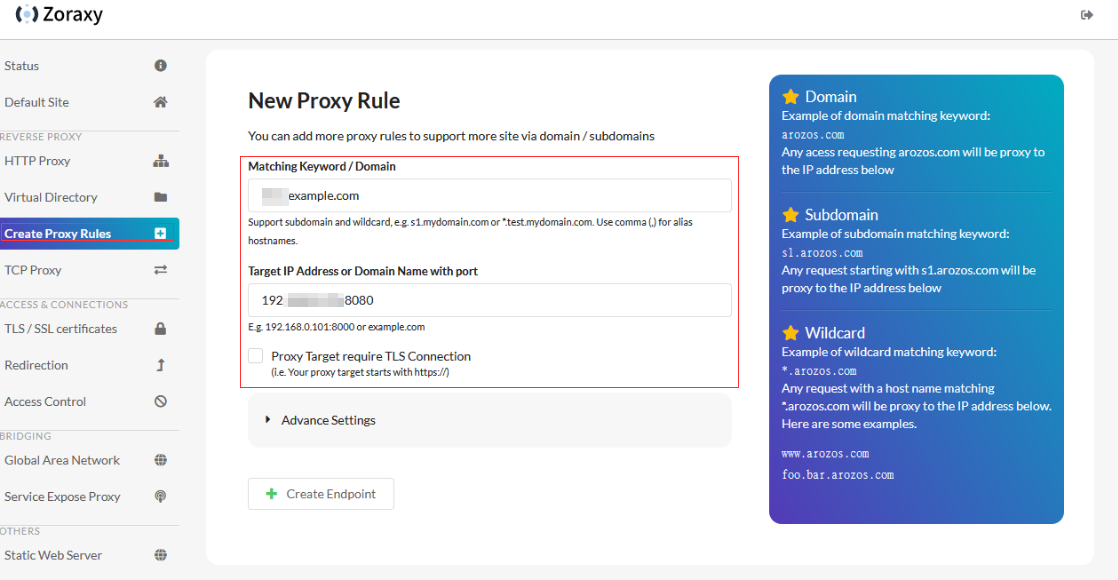
In order to create porxy host, navigate to Create Proxy Rule from the left hand menu
Create Proxy Rules > Fill in all the information > Create Endpoint and fill in the information as follows.
And there you go, You have installed Zoraxy Reverse Proxy. I haven't covered many part of this installation like SSL Certificate and Access Control. You can find the detailed document in the official Github page.
Official Guide :
 tobychui
Thanks to Toby Chui who behind this beautiful product.
 tobychui
As always let me know if you have any questions.